Wednesday, April 13, 2011

Scrapbooking With Timepiece by Bo Bunny


jules
The Timepiece Collection, while at first glace, may seem to be vintage and heritage only, offers many more possibilities.  I selected this line with more cruise pictures in mind and I still will be using some of them for that.  However, once I started on one of the two mini albums I ended up doing, I knew I wanted to use these papers for those; one of which is going to be my anniversary present to my honey. 

The Clock mini album by Bo Bunny provided me with something I had been wanting to do...celebrate my current life.

Back in my late 30s when I was raising two kids by myself and working two jobs to do so, I would sometimes despair that this is what my life was meant to be and nothing more. Not that raising two wonderful kids was not enough but...
And, right before I turned 50, life came together for me. I connected with an amazing man with whom I had worked for over 20 years; the kids got their lives together and now...I am 63 and

HAVING THE TIME OF MY LIFE!

It Is My Time


Inside Album View:


The second mini album I completed with the perfect and lovely Timepiece papers and embellishments is to be the anniversary present from me to my husband of 16 years come June 1.  When we were first married, I owned a three story condo in St. Louis built on a former golf course. 


Making A House A Home


During the years we were still living in St. Louis, teaching, my honey finished off the lower level, added a much needed bathroom, repainted the entire condo top to bottom and installed badly needed storage.


When we moved to Ft. Myers, he oversaw the construction of our new home, landscaped our yard and turned it into a wonderful retirement home for the two of us and all our company. 


Then when we moved here, once again, he painted, arranged, landscaped and made still another house into a home.  This is my thank you to this warm, wonderfully talented and loving man!


This is the back with the front flap brought forward.  This can be displayed as seen in the first photo or set up so all four sides fold out like rooms of a house and the album is self standing.  It was such fun to use all the little widows and doors to create the "home". 


I had an amazing time working with this line!  Thank you, as always, for looking.

---------------------------------------------------
Jules is a retired English teacher originally from St. Louis, MO.  Besides paper crafting, she enjoys traveling with her best friend/husband Gene, kayaking and teaching scrapbooking classes locally and nationally.

Monday, April 11, 2011

Scrapbooking With Ellie's Tale By Sassafras Lass

Posted by happayscrappay (Rachel):

Today, April 11 would have been my grandfather's birthday. He died a few years ago but my memories of him did not.  As you will see, none of the pages I made this month are of him but, this paper reminded me very much of him.  When I was a child, I would visit him and my grandmother in Michigan.  They lived in a mobile home and had bunkbeds in the room where I slept with my brother.  

On the bed was an Emmett the Clown doll.  Thinking of the circus or things related to the circus reminds me of that clown doll.  Ellie's Tale is not circus paper in the most traditional sense of the word, but it has a whimsical circus appeal from the elephant, to the feathers, to the sprays of flowers, to the pennants and other banner sticker shapes this line screams at me of the circus, good times, cotton candy, elephants, and clowns.  

The colors are cheerful, the patterns uplifting, and the papers so very filled with fun whether you scrap boys, girls, children, or adults.  Take a trip with me to carefree, good times as we look through the pages I made with Ellie's Tale by Sassafras Lass.

The first page that I made is such a treat.  As soon as I saw the flowers one of the (Play By Play) sheets of paper, I knew what to do.  I pulled out a picture of my son at the fair carrying a bag of kettle corn that is in competition with him to see which is the tallest!  I cut shapes of off white from one of the papers, folded them at the corners and drew "X" in the middle.  The idea was to make the flowers look a little like popcorn spill from the bag down the page.

Advice

I framed the page by cutting out the center from the paper and laying it over the feather paper (btw, those feathers are my favorite paper of the whole line!).  I added a sticker from the label sheet that I cut and placed above and below the picture on the page.  Another fantastic feature of Sassafras Lass is the borders on the paper.  They've added to it with sticker borders that also coordinate.  I've used one of each here.

Another good time we have around here is during the local firetruck rally.  We're lucky to live a very short walk from the start of the parade and I was able to capture a picture of the boys with the color guard that leads the firetruck procession down Broadway. 

Two Little Boys And Fire Trucks

While the black spray on the the background may look tedious or detailed it was really made with very little care.  Choose the spray ink that you want to use, aim it at your page, and spray away until excess liquid is visible on the surface of the paper.  Then, simply pick up the paper, allowing the ink to run down the page.  Layer stickers, strips of paper, and the newest addition to the Sassafras Lass product line - foldies die cuts, over the sprayed area and your photos. 
 
History is a very important part of the area where we live.  Our house is over a century old and we often attend events that celebrate the history of our our area.  The music note paper (Score) reminded me not only of circus music but of patriotic music - marches and anthems - and all the thing that go with it.  The canon demonstration at the local fort provided the perfect patriotic themed pictures to go with the paper. 


I roughed up the background by gluing the paper to the cardboard that comes with all of my ACOT shipments and then ripped the paper off to distress it.  I also cut a thin strip of cardboard and glued it sideways to the lower edge of the white paper to ground the page.  

The journaling tags provided just the right punch of color for under the pictures so I cut them up and layered them in with the Sweet Treat shaped stickers.  The real treat of the day was watching that canon fire a real canon ball and hanging with my boys while we celebrated our city's heritage. 

While this line has been great to work with, I have to admit, I saved the best for last.  

stay on target

The large circle of Simply Stated reminded me of a very large target and the yellows of my son's scouting shirt were a perfect match for the yellows in the Play by Play paper.  They simply all had to go together.  To create this page, I cut a circle of Play by Play that fit inside the target area of Simply Stated and then I ripped out the middle of the circle .  

I decided the placement of the gears, stickers, and title before sewing the circle onto the background.  To ground the page, I added the border stickers along the bottom and a border strip along the bottom of one of the pictures.  The absolute last thing I added to the page was the sewn and torn teal circle around the outside of the target area.  

I thought the page needed an additional pop of color.  So, I tore the edge off a piece of cardstock, laid it on the page at the edge of the circle, and sewed on the line in the red part of the paper until I got to the end of the teal cardstock where I tore the cardstock off leaving the sewn part behind.  I continued this process until I made it around the edge of the circle.

I hope you can see why I loved this line so much and that it provides a punch of fun, color, and fond memories to your next project. Check out Ellie's Tale and other fun Sassafras Lass products in the store!
----------------------------------------------------------------------
Rachel is a Chemistry Professor, mom, hiker, wife and knitter extraordinaire!  She has been scrapbooking since 1998 and resides with her family and two dogs in Missouri.

Friday, April 8, 2011

Say It With Word Art -

Posted by MamaK321 (Kristianne):

Word Art is pre-designed and often decorative quotes, titles and scrapbooking page accents that you can use in place of, or to accent, journaling or page titles. If you are having a difficult time finding the right words to say, try some Word Art! Let the Digital Creative Team share some of their favorite Word Art products and show you different ways to make this easy digital element say it for you.

Wearin' Green by MamaK321
Kristianne placed her word art within the journaling:


Travel Story by Jenn Kellams
Jenn used her word art as a simple page accent:


Family by fong33
 
 
Your Sunshine by MamaK321
In this layout, word art makes the perfect title:

 
Create Memories by sarahwhithers
"...no matter how you use it, it can add that perfect look to a page!"


Kenna Bug by Jenn Kellams:


Ocean Of Time by MamaK321
"the wordart... is layered beneath the journaling to support the theme."


A Lovely Day by Jenn Kellams:
 

Spring is here by MamaK321:


Thursday, April 7, 2011

Cosmo Cricket's Social Club & Glubers !

Posted by Kimandasmo(Cindy):

Join the club. Have you ever heard the name of a line of paper and had it hit a sentimental note? This new line by Cosmo Cricket was like that for me. As soon as I heard the name of the line was Social Club, I knew I had to have it, sight unseen.

All through my years of growing up, my grandmother was always saying she was going to Social Club. The names of the individual papers are just as sentimental, such as Jazz, Martini, Cocktail, Swingin' and Blue Eyes. Cosmo Cricket is always known for its great papers with uniques patterns and this line is no different. It has large vibrant patterns as well as more subtle smaller patterns.

For my first 3 projects I chose to use the biggest social event of the year, for any high school senior, at least. Prom. Some of my daughter's friends got ready for prom at my house, even though she was not going to prom this year.
For this first one, I cut flowers from Blue Eyes, and layered them on top of Swingin'. Added some chipboard flowers from Ready Set Chipboard.

I also added some bling bling, and a few pieces from the elements sheet.


This next one is a little more playful. I layered Cocktail on top of Swingin'. I used some of the Butterflies and Doilies to accent the page. The title came from Ready Set Chip.


This scrapbooking layout is a little different, as I wanted to give this to his mom. I found this frame at my local thrift shop and it matched these papers perfectly. This young man was the date to the young lady in the first layout, so I wanted the pieces to be complimentary to each other.

So often we scrap the pages of our memories and put them away in an album somewhere to only be pulled and flipped through occasionally. I wanted this to be different. I want her to be able to put it on a table and see it everyday. I love the way this turned out and plan on doing more pages this way for my own home.


For this quick card I used the scraps from the above projects as well as some Social Club cardstock stickers and a piece from the elements paper.


My last project I used some of the other colors and designs from this line. The base is Jazz, layered with Martini and borders. It is embellished with Butterflies and doilies and a flower utilizing the new Cosmo Cricket Glubers.


What are Glubers and how do they work? Glubers are various size large glue dots. They work just like smaller glue dots but they are huge! perfect for making whatever type of flowers or other embellishments you may like. I am in love with these and you will be seeing many "flowers" on upcoming projects using the few of these I have left.
------------------------------------------------------
Cindy lives in Florida with her husband and two daughters.  She has been a scrapbooker for over 10 years and is brilliant at creating paper flowers.  You can view all of Cindy's articles in ACOT Resources.

Wednesday, April 6, 2011

Scrapbooking With Jenni Bowlin Studio


Posted by 4peasinourpod(Pam)

My love for Jenni Bowlin Studios is legendary.  This time around, however, I cowered at the chance to work with her new line.  I actually, if you can believe it, was hoping that one of my Creative Team members would ask me for it, and I could assign it to them.  You see, it almost only consists of embellishments this time around, and I really didn't think I could do it justice.  But.....it is Jenni Bowlin.  So I HAD to try.

Once I sat down, though, things started falling into place.  Jenni Bowlin is a classic scrapbook designer...her lines from season to season are based on the same color schemes, which is incredible.  I could pull alphabets out of my stash to work with, for example...it is true to that vintage quality that makes Jenni Bowlin like no other.

Conveniently, her color scheme matches my daughter's select team basketball colors.  If any of you have athletes that you scrapbook, you know how difficult it can be to create a sports layout.  These embellishments are perfect for this!  The banners and chipboard add color and dimension...and the simple layout is totally focused on the subject at hand.


Here is another athletic layout.  These embellishments are perfect!


one last one....


I haven't used a rub on in FOREVER.  I saw this clock, though, and HAD to have it.  Delaney is my youngest child...and every minute that we have together is precious to me.  She almost died on the day of her birth, so I wanted to make the clock the focal point of the layout.  I wanted it simple and sweet....which is so easy to do, Jenni Bowlin style.


There was only one sheet of paper, but it is BEAUTIFUL.  So I decided to create a layout using a photograph that I took this year on my girls vacation with 3 of the most beautiful women (inside and out) that I know.  This layout incorporates both new and old Jenni Bowlin, as well.


Lastly, I did a quick layout with just a touch of Jenni Bowlin embellishments....the yellow bow.  I love it!


I am in LOVE with these banners and the matching stickers, as you can see.  Please check out all the new (and matching older!) Jenni Bowlin in the Shoppe!
-------------------------------------------------------

Pam lives in Wisconsin with her four children and husband.  Besides scrapbooking, she enjoys altering items and making gifts.  Pam is ACOT's Creative Team Coordinator.

Tuesday, April 5, 2011

April Scrapbooking & Paper Crafting Challenges!

Welcome, April!  Surely the warm breezes and Spring blossoms we have been waiting for are on the way now!  Just as Spring brings new life all around us, this new set of challenges should help bring new life to your scrapbooking... at least we hope so! 

Remember:
- only one LO per challenge will enter you into the points drawing
- LOs cannot be entered into more than one challenge category
- *please* only enter LOs that meet the specific challenge instructions 

Card Challenge - By bluejeans7 (Angela)
Paper or Digital Scrapbooking

I remember back when tags were the "in" thing for scrapbooking. So if you are like me then you have a ton of leftover tags in your stash. So it's time to dig out those old tags for this month's card challenge. I want you to create an Easter card with at least one tag on it.


Die Cut Challenge - By Dianedi (Diane)
Paper  Scrapbooking

For the April die-cutting challenge, create a card or layout with your die-cutting machine using ovals as your inspiration! Think Easter Eggs! Create the ovals with a Cricut, Sizzix, Silhouette etc... Be sure to tell us what machine/cartridges that you've used! I've created an Easter card as an example, but you create a card or layout that isn't Easter themed! Have fun!


Faithbooking Challenge - By Keling (Sara)
Paper or Digital Scrapbooking

April Faithbooking Challenge - "Faith"

My favourite definition for faith is from a song by Michael Card: "To hear with my heart, To see with my soul, To be guided by a hand I cannot hold, To trust in a way that I cannot see, That's what faith must be."


Grab more scrapbooking inspiration by viewing this month's complete Challenge List for April!  After creating your project, be sure to submit it to the corresponding Challenge section of our Gallery. 

Monday, April 4, 2011

Meet Our April 2011 Guest Paper CT Member!

immom2anc (Kristen)

Here is an excerpt from Kristen's interview:

Name: Kristen (but most of my friends call me Sis, and these crazy monkeys refer to me as Mom). Married to RC for 7 years now (but we've been together for over 12; high school sweethearts). Have 2 sweet little monsters girls and baby boy on the way (due July 2011). We're California transplants living in the Phoenix Valley and LOVING it!

'Love You 4 Ever' using Prima's Madeline Collection


Favorite thing to do with your family? Lay in bed, and snuggle into a movie with the lights out. I love the quiet time and the sweet sound of them breathing next to me.

 'Family Is Everything' by Kristen


What's your favorite scrapping tool to use when scrapbooking? I'm bi-scrapual (both digi & paper), so for traditional scrapping, I couldn't live without my Fiskars Deluxe Trimmer; I don't know how I cut paper before that thing. And with my digi stuff, I'm seriously in LOVE Photoshop CS5! It rocks!

To check out the rest of Kristen's product reveal featuring Prima's Madeline Collection, be sure to read the 'April Guest Paper CT' article on ACOT's Resources Page.


Friday, April 1, 2011

Getting The Most Out Of Your Digital Scrapbooking Kit

Posted by nun69 (Angie):


Angie recently retired from the US Navy after serving for 20 years.  She has been digital scrapbooking since 2006 and a member of our ACOT family since 2000.  Angie enjoys the versatility of digital scrapbooking and hopes to own her own photography business soon.

 -----------------------------------------

 
Have you ever wondered how different people see different kits? Well, this week the digi CT took 3 kits and highlighted them in more than 3 ways. So if you think a kit is too girlish or too boyish or too themed, you may want to think out of the box before you count it out~
 

Look at the kits we highlighted and how many different ways we used them....1st up is this Grins and Giggles kit by Bella Gypsy:
 

by Ronny:


we also highlighted this FAB 'Elegance' kit by MC Designs~

 
by Brittney:


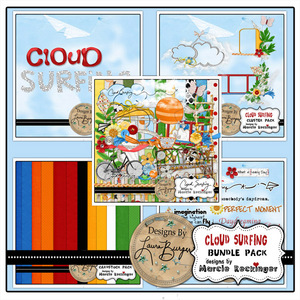
And last but not least, the 3rd kit by Laura Burger and Marci Reckiner - Cloud Surfing Bundle Pack:
by Janell:


by Angie:


by Sandra {our digi gust CT}:


Be sure to check out the '1, 2, 3 What Do You See' article on ACOT's Resources Page to view all of the layouts our Creative Team designed using all three digital kits!  Great job, team!