Wednesday, February 22, 2012

How To Make A Chipboard Journal - Part One

Learn how to make a paper crafting Chipboard Journal with Suzie Crafter in this three part tutorial!
  
Part One:
Finished Project:
How to make a Hard Cover Journal

Thanks Suzie!
- Stay tuned for Part two -

Products Used:

Tuesday, February 21, 2012

How To Heat Emboss With Embossing Powders And Heat Gun


Posted by SarahA


I've put together a short video on the basics of heat embossing. Heat embossing can be fun to make your own custom embellishments or for adding some extra oomph to your stamping projects. And as a disclaimer, I do not claim to be a videographer by any means! LOL! I just thought it would be easier to show you how to do the basics by video rather than by a bunch of photos.
In the video, I show how to add emossing powder to chipboard butterflies. You can use this same idea to change up the color of chipboard alphas or any other shapes you have. You can stamp on transparencies with the Perfect Medium and emboss that as well for a one-of-a-kind embellishment. 


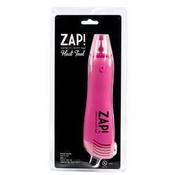
If you need a heat tool (and can't borrow your husband's!), you can get one here in the ACOT shoppe, too.


Here is a scrapbooking layout where I used the UTEE and Perfect Pearls in Biscotti to more of the butterflies.


Products used:
Biscotti Perfect Pearls Pigment Powder  Sunflower Perfect Pearls Pigment Powder  Clear Ultra Thick Embossing Enamel Melt Art UTEE  Pink Glitter Finish Embossing Powder By American Crafts Red Metallic Embossing Powder By American Crafts  Perfect Medium Clear Stamp Pad  Butterfly Chipboard Shapes Classic Calico By Studio Calicozap heat gun

Monday, February 20, 2012

Announcing This Week's Crafty Giveaway!

Now through April 7, 2012 we're giving away all kinds of goodies every week!

Be sure to 'like' our facebook fan page for all of the details and to enter!

This week's giveaway - 720 Yards Of Twine!!!

fans win sweepstakes

Click HERE to view the official sweepstakes rules.

Sweepstakes open to all residents of the US and the District of Columbia. 
Void where prohibited.  

Friday, February 17, 2012

Congratulations To This Week's Facebook Winner!

Congratulations

Melissa M. 
of
Newburgh, NY
 
You've just won a Martha Stewart Crafts Prize Pack!  Check your inbox for a special email from ACherryOnTop.com -

Thanks for liking our facebook fan page!

Want to enter next week's giveaway?  Click HERE for details!

Join us on Facebook
Click Here for list of previous winners and for official rules.

Wednesday, February 15, 2012

Do It With Twine Contest - $100 Prize!

Do It With Twine Contest
sponsored by ACherryOnTop.com


PRIZE: $100 ACherryOnTop.com Gift Certificate
NO PURCHASE NECESSARY TO ENTER OR WIN
Purchase does not increase chance of winning


Show us your craft project using Twine
Feb 15-Mar 24


twine contest


HOW THIS WORKS:
1. Create something really cool and original showcasing your use of Twine - perhaps a layout, card, paper craft, or any other craft project that you can think of. You must use NATURAL twine. It may be colored twine, natural twine, hemp twine, jute twine or cotton twine. No synthetic: nylon, acrylic or polypropylene.

2. Create an account at ACherryOnTop.com AND a screen name (if you don't already have one)


3. Take a picture of your finished project, then submit to our Twine Contest Gallery.


And that's it! We are looking forward to viewing your great ideas!

JUDGING CRITERIA
Our independent panel of judges will select a winner based on the following criteria:
- Originality and innovation
- Imaginative use of materials
- Quality of workmanship
- Quality of photo
- Overall presentation

THE RULES
1. Promotional Period:  February 15 through March 24, 2012 (midnight, EST)
2. You may submit up to 5 project entries. All entries must be uploaded to our Gallery during the Promotional Period. No mail-in entries will be considered.
3. Each project must be your original work and may not be commercially displayed or submitted to any other layout gallery, contest or publication.


twine contest


View complete contest rules and submission details by clicking HERE or by copying and pasting the link below into your web browser:

http://www.acherryontop.com/articles/Twine-Contest-16609


Monday, February 13, 2012

Announcing This Week's Scrapbooking Giveaway!

Now through April 7, 2012 we're giving away all kinds of goodies every week!


Be sure to 'like' our facebook fan page for all of the details and to enter!


This week's giveaway features amazing Valentine's Day products from Martha Stewart Crafts


Check out the video below to see what we're giving away!


facebook giveaway

Click HERE to view the official sweepstakes rules.

Sweepstakes open to all residents of the US and the District of Columbia.  Void where prohibited.  

Friday, February 10, 2012

Welcome Jenn - Our Feb 2012 Guest Creative Team Member!

Hi Cherries. My name is Jenn and I am so excited to be the GCT for this month. I have so much in my life to be happy about and am thrilled to be able to share a little bit of that with you. I am engaged to the most wonderful and amazing man who has taught me so much about love. Between us we have 3 awesome children, one little angel in heaven, and 3 cats that are just as spoiled as our children are! 


My family keeps me busy and is usually the focus of my scrapbooks. If I am not hanging out with the family, you can usually find me scrapbooking, reading, watching sports, or baking. I started scrapbooking as a young girl. I loved to cut pictures and articles out of magazines and glue them into other books. Thankfully my scrapbooking as evolved greatly since then. I love all styles of scrapbooking, but tend to gravitate towards more simple and clean pages.

When I think of February, I instantly think of love and Valentine’s Day. So for my reveal I wanted to showcase some of the people and things that I love. What better way to do this then with Basic Grey’s Kissing Booth collection? I love the colors of this line and found it to be very versatile. I love how the colors and designs blend and coordinate with each other, making it very easy to work with.


For my first layout, I wanted to share with you the love of my life. I choose the background paper (Oh Darling) because of the outdoor feel to it. The picture was taken while we were camping so I thought it was perfect. I used the back of xoxo, the back of we belong, as well as the back of kiss to help accent the picture. 


To add a little bit of depth I used stickers from the Kissing Booth Elements sheet. I love that the alphabet sheet came with three different fonts in three different colors. I used all 3 alphabets from the alphabet sheet to make the title. In order to help make the stickers and alphabet pop I outlined them with a fine tip marker. 


I also wanted a little bit of contrast between the papers since they blended together so nicely. In order to create that effect, I inked all of the edges using Chestnut Cat Eye pigment ink by Colorbox.


For my second layout I wanted to focus on my love of my children. I am so blessed to have 3 awesome kids. I really wanted the focus to be on the pictures of the kids so I chose to work with more subtle papers and only 1 pattern paper. I used the back of Hugs for the background. I also used the front of We Belong, the back of Kiss as well as the back of XOXO. Once again I used ink to help contrast the papers. 


I used Chianti Cat's Eye ink by color box. The deep red helped to bring some pop of color to the dark subtle papers. In trying to keep the focus on the pictures, I used the lovely mini pink alphabet to add names to the pictures while using the browns for the title. Did I mention how much I love this alphabet sheet? I used the element sticker sheet and the layered banner sticker sheet to create a couple of accents on the page. The flower stickers were a great way for me to hide my adhesive on the vellum!


For my final layout, I wanted to do a snapshot of things that I love. Pink is my favorite color so I wanted to incorporate lots of pink into this layout. The way these papers coordinate are awesome. I used the back of Truly, the back of Kiss, the front of Butterfly Kisses, the back of XOXO, the back of We Belong, and the back of Butterfly Kisses. I inked all of the edges using Chestnut Cat's Eye pigment ink by Colorbox. Using the element sticker sheet, the alphabet sheet, and the layered banner stickers I created a visual triangle to help bring focus to the list of things I love.


When I was finished with my layouts I realized I had some nice sized scraps to work with. I hate to throw anything away so I used the scraps to make a couple of Valentine’s Day cards.


Products Used in this Reveal:

Wednesday, February 8, 2012

February 2012 Paper Crafting & Scrapbooking Challenges

Posted by megamay

So how are those new year's resolutions coming? Are you scrapping up a storm to meet your goals? If not, here is some incentive: all the new products from CHA will be arriving in the store soon. So, get scrapping and use up some of your stash to make room for all the fun new products! Here are some inspiring challenges to help you do just that!
Remember:
- only one LO per challenge will enter you into the points drawing
LOs cannot be entered into more than one challenge category
- *please* only enter LOs that meet the specific challenge instructions  

Ad Inspiration Challenge by MamaK321 (Kristianne)
(paper, digital, or hybrid challenge)


All About Me Challenge by milmomma (Brittney)
(paper, digital, or hybrid challenge)
This months AAM Challenge is all about a typical day. Tell us your favorite part, or tell me what your usually day is, or whatever you want to tell me about your day. I chose to give a photo story of my typical Tuesday with a touch of journaling telling about my favorite part.

Trends and Techniques Challenge by Megamay (Meg)
(paper, digital, or hybrid challenge)
Chevron (or zig zag) is everywhere these days. So this month I challenge you to use some chevron on your layout. You can use paper that has chevron on it, or create your own. Ive seen a couple different tutorials on how to create chevrons. Here is one from Jess Mutty showing you how to make your own chevron pattern using triangles. http://scrapgoo.blogspot.com/2011/12/fresh-air.html
and here is my example. I used some amy tangerine paper that was preprinted with chevrons.


You can view all of the fantastic challenges by checking out the February Challenges post in our Idea Center!

Tuesday, February 7, 2012

How To Add Stitching To Your Paper Crafting Project

Posted by megamay (Megan):


This month I decided to show you some tips on adding stitching to your paper crafted projects. I seem to add sewing to just about every layout and card that I make. Most of the time I use machine stitching because it's fast, easy and I like the texture that it adds. 


There are other options though - hand and faux. If you are interested in hand sewing, Rachel wrote two articles on using the 'Sew Easy' tool to help with hand sewing. 


Below is an example that I created for hand sewing without using the sew easy tool. This technique is best for odd shapes, like the sun I created on this card:


I drew the sun in the corner of this card with pencil. Then I used my paper piercer to make the holes, before erasing the pencil lines. Then I hand stitched using the holes I just created.


I also used some faux stitching on this card. I just used a brown pen to draw the 'stitches' around the border of the card and of the sand dune. There is another We R Memory keepers product that can help with faux stitching - the sew stamper


 It is a rolling stamp pad, just like the sew easy, but with ink instead of piercing. Be sure to check that out if you prefer faux stitching for a super quick easy way to add another layer to your projects.


Like I mentioned before though, my preferred method is machine sewing. Here is a card that I created with machine sewing.


sewing on cards


I know a lot of people are intimidated my machine sewing, so I created this video tutorial to show you some tips to make it more effective. As I mention in the video, in my opinion, the hardest part is threading the machine. So, don't get discouraged if you are having trouble right up front. 


Look in your manual or if you dont have a manual look around online for instructions for threading your machine. It's important to do it correctly so the thread doesn't get all bunched up. After you have done that - machine sewing on paper is easy as pie!


Products used in this reveal:

Monday, February 6, 2012

Back From CHA Winter 2012

It's hard to believe a week ago today Kristin and I were browsing the over 200,000 square feet of the Craft and Hobby Association (or CHA) show in Anaheim, California.  CHA is always a fantastic experience!  Seeing the thousands of fellow crafters, hobnobbing with designers and manufacturers and of course getting to actually touch all of the newest products being released throughout the coming season make CHA a must-attend event!

Brian from Epiphany Crafts


Shape Studio Demo

Kristin and I got to spend a lot of time with some of your favorite manufacturers.  

Heidi (ACherryOnTop) & Teresa Collins

We also got to taste some amazing food!

Bananas Foster!  Yummm!
We seriously love doing what we do.  We are very thankful each and every day for being able to work in an industry we enjoy!  We're working to keep the 'Coming Soon' section of ACherryOnTop.com as current as possible!  Be sure to click the 'Notify' button to receive an email as soon as the newest items become available.


Thanks for reading!