Showing posts with label stamping. Show all posts

Wednesday, September 28, 2016

Watch This Video Preview: The Laser Square from WRMK

Video Preview: The Laser Square Tool by We R Memory Keepers makes creating with accuracy a cinch! 

Coming soon to A Cherry On Top Crafts: http://bit.ly/2cz56ku


Click to Watch Preview

The Laser Square will help with photo placement on scrapbook pages, stamping, home décor and so much more! This item is expected to arrive this Fall at A Cherry On Top, but you can pre-order TODAY!

Shop Now at http://bit.ly/2cz56ku

Friday, September 16, 2016

Watch This Video Preview: The Precision Press from WRMK

This amazing new stamping tool from We R Memory Keepers will make mass producing your greeting cards a BREEZE!

precision press stamping tool wrmk
Click to Watch Preview

Make creating gradient or ombre stamping a cinch with the Precision Press by We R Memory Keepers. This item is expected to arrive in our shop in the Fall of 2016. Pre-Order yours today!

Shop Now at http://bit.ly/precisionpress

Tuesday, June 28, 2016

Video Preview: Let's Be Mermaids Paper Crafting Collection by Echo Park


Watch this video preview featuring Echo Park Paper's adorable, new paper crafting collection: Let's Be Mermaids


Perfectly girlie! Create a project for the mermaid in your life. Products now available at ACherryOnTop.com Crafts. 


 let's be mermaids paper and stickers


Tuesday, September 17, 2013

How To Use Perfect Pearls To Make Your Greeting Card Shine!

Posted by JeanMartin


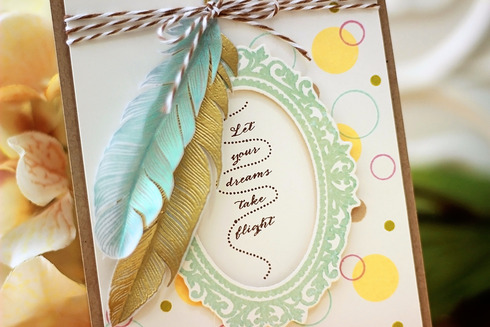
Typically, you can find metallic embossing powders only in gold or silver.  Using Perfect Pearls with a darker back drop or on vellum can really make your project stand out!

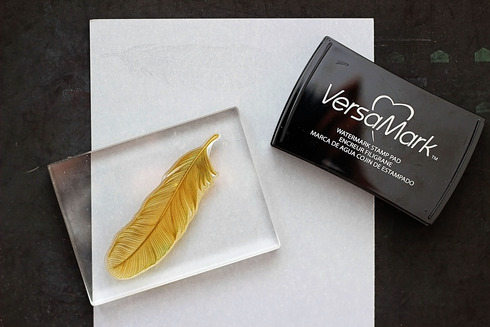
First - stamp the image onto vellum using a watermark ink like VersaMark:


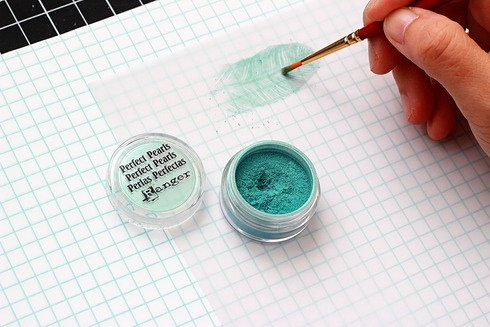
Next - select your favorite Perfect Pearls pigment and use a craft brush to apply the powder to the stamped image.  If you're using a dark cardstock, be sure to apply in small dots instead of just brushing it on.  Doing this will help you control where you place the pigment.  If you're applying to vellum, use a normal brush motion.


After you're done, lightly spray with a little water to avoid any warping to your vellum.  If you're unsure about this, just practice a few times. 


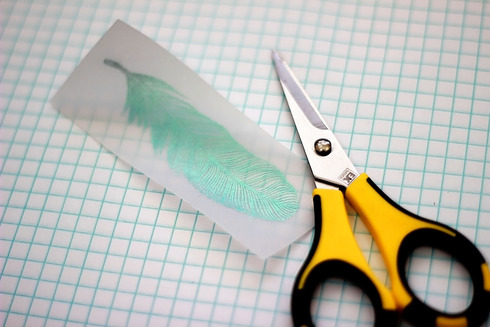
At this point you can fussy cut around your image to bring out the details:


There are so many ways you can incorporate Perfect Pearls into you project - including heat embossing!  If you want more ideas, please click here to view more of this how-to on the A Cherry On Top website.

Thanks so much for stopping by - Until next time!


Suggested Supplies:


bakers twine acherryontopframe die acherryontopfeather stamp acherryontopperfect pearls pigment ink acherryontopwatermark ink acherryontop


guest designer call
Click here to find out how to submit


Friday, August 10, 2012

How To Get The Most From Your Paper Crafting Stamps


Laura shares five different projects focusing on specific how-to techniques and ideas which can be used using just about any stamp, paper pack and, or color scheme out there!


Stamps are an investment.  We buy them because they seem like a long-lasting, worthwhile, crafty purchase. We justify the expense, promising ourselves that we will get tons of use from them and they'll be super practical. And guess what? That is completely true.

Today, I challenge you to bust out one of those stamp sets (and hey, if you realllly want to... go buy a new one, I won't tell) and try some of these simple techniques and ideas to get some use out of those great stamps! 


1.  Layer Your Stamps:
Stamp a background over an outline image.  To create the tag on this card, I stamped the polka-dot background, and then the tag outline and sentiment right over it.  Polka-dots are my FAVORITE; they just make me HAPPY!  Think about what stamped images you can add a pattern to. (a polka-dotted tree, teacup, or cloud? ADORABLE.)    

Lily Bee tag card by Laura Williams
 
2. Trim and overlap stamped images:
To create this candy tube, I stamped and trimmed the background square, and then stamped the flowers on patterned paper and cardstock.  I trimmed them, and layered them on, using foam tape to add some dimension. (Remember how I love polka-dots? Well, I love foam tape almost as much!)

candy tube by Laura Williams, from A Cherry On Top
 
3. KISS! (Keep it simple, silly!)
Grab the one or two stamps you like the best and let them work their magic. Don't get bogged down in the details.  On this card I used two stamps, added a bit of colored pencil, tied a piece of twine, and called it DONE. It took less than 5 minutes.  YOU CAN DO THIS TOO!!!

Lily Bee chickadee card by Laura Williams, for A Cherry On Top.com
 
4.  Repeat, repeat, repeat:
Take a stamp. . .just about any stamp. . .and make a background.  To really add some depth, try "second-generation stamping", where you stamp twice before reinking. Stamp, stamp, ink.  Stamp, stamp, ink. Got it? ;)  Make sure you stamp over the edges to make it look more like an actual piece of patterned paper.  And on this card, I didn't even do the entire background of the card.  A nice stripe at the bottom was enough.  (Add "simple" to my list of favorite things, right after polka-dots and foam tape!)

Lily Bee card by Laura Williams, for A Cherry On Top. com
 
5. Think Outside of the Box:
On this card, I wanted to use the square backgrond stamps in a new way.  So I stamped them on cardstock a few times, and then after I trimmed the squares, I trimmed them each in half.  It made a fun easy design that fills my card. (And lookie there. . .polka-dots, foam tape, simplicity! ahhhh!)

Lily Bee and Bazzill card, created by Laura Williams, for A Cherry On Top

Remember, nothing I've shown you today is groundbreaking or complicated. But sometimes we all need a refresher, and an inspiration to look at our stamps in a new way.  I hope you'll take one (or two, or five) of these ideas, and you'll dive in and CREATE with what you love! 

projects created by Laura Williams, for acherryontop.com


Laura loves bright colors, graphic patterns, clean and simple everything, polka dots (and chocolate!) She is a card-maker and stamper at heart, but also enjoys creating all kinds of paper-crafty goodness! Her work has been published in Paper Crafts, CARDS, CardMaker, Simple Scrapbooks, and Crafts 'n Things. 


Friday, September 9, 2011

Image Transfer Paper Crafting Tutorial


Posted by ChrissyTina (Christina):

Hi everyone!  


This tutorial is going to focus on a cool paper crafting technique I saw on a blog.  I can’t remember the site, but as soon as I find it, I’ll share it with you.  Now this technique uses simple household items and is a really cool trick to use, especially if you have trouble stamping.


Supply List:
Stamps
SOLVENT ink*
Clear packing tape
White cardstock (non-textured)
Luke warm water
Soft gel medium
Paint brush


Now, the reason why solvent ink is starred is because this is very important.  Any ink that is water soluble or water based will NOT work with this technique.
Since we have our supplies, let’s get started.  The first step is to stamp your image onto the white cardstock.  Try and get as bold of an image as you can.  If you are not a perfect stamper, that’s ok!  The key here is to get as much color onto the cardstock as possible.


Next step is to apply the packing tape.  When you apply the tape, make sure there aren’t any bubbles.  After you’ve applied the tape, go back over it and REALLY REALLY press the tape onto the paper.  You want to ensure maximum contact between the paper and the tape.  Once you’ve done that, trim off the excess tape.


Once the tape is applied, trim your image.  This is fussy cutting to an extent.  But don’t be scared!  Trim off as much of the paper as you want.  This is completely customizable!


Now the fun begins!  Once your image is all trimmed and pretty, submerge it in water.  If it curls, it’s ok.  See?  Mine curled a little bit.  Leave your image in the water for about 5 minutes.  If it goes a little over, no biggie.  While it’s soaking in its own little spa, go prep your project that you are going to adhere this little gem onto.


Here’s where the magic becomes visible.  Take your image out of the water and pat it dry.  Flip it over so that the tape is facing down onto the table.  Now gently rub your finger back and forth on the wet paper.  If it doesn’t start peeling off right away, then use your nail to gently peel off the top layer.  


Once you have an “edge” lifted, start rubbing the paper off with your finger.  This will take a few minutes.  It’s important to be gentle so that you don’t rub the image off of the tape.  Keep rubbing until there aren’t any more little pill balls.  I like to leave some thin paper in spots because I like the funky look it has.


Now you can understand why water soluble and water based inks will not work.  Once the ink makes contact with the moisture, the image runs and eventually rubs off.  Another little tidbit for you, this doesn’t work well with Copics either.  I tried coloring an image with them and when I rubbed the wet paper off, some of the ink from the Copics would rub off as well. 
Now let’s look at our completed images!


It’s time to put our images to use!  Break out the gel medium and the paint brush.  You can really funky it up like I did on the “Funky Tag”.  I used a more course paint brush so that you can see the brush strokes.  Or you can go softer like I did on the “Fall” card.  I used a soft brush so as to leave no visible brush strokes.  Apply the gel medium onto the surface of your project.


Brush the gel medium onto the back of the image.


Adhere the image onto your gel’d surface.  Make sure to press all the of the air bubbles out.


Finally, brush gel over the entire surface of the image and the project surface to ensure a nice adhesion. 


Once the gel dries and you finish your project, the last step is to ADMIRE!


This technique is very handy.  It works well for all levels of experience.  You can be a pro stamper or a novice.  If you make a mistake, no biggy!  It adds character!
 
You’ve seen the “Funky Tag” already. 


Here’s the same technique used on a layout and a card.  In these two projects, it’s a more subtle detail.  However, it’s subtly speaks volumes if you could see these in real life.


Now that you’ve got a really handy technique in your arsenal, whip something out let me see how YOU put it use!

Products Used:
       

Wednesday, June 8, 2011

How To Use Stamps, Stains And Inks In Paper Crafting


Posted by JulesinParadise (Jules):

I make lots and lots of tags.  I send them instead of birthday cards; I give them as book marks and use them on layouts.  I love to get my hands all covered with inks and stains and glitter and glue.  

I recently made these two tags and they will join my stash of tags to send to special people on special occassions. All of these techniques can be used on cards and layouts as well.


First I gather my supplies:  stamps, acrylic stamp pads, inks, the wonderful new Ranger distress stains, cardstock, a piece of transparency that came with my stamps as a cover, ribbons, Stickles and the Liquid Pearls along with a mask.

First, I apply one coat of the Ranger Distress stain.  This is a fantastic product and comes with its own built in applicator.  It goes on just like shoe polish.  I add color layer by layer until I get the tags the color I want.  It is also so easy to add color to various areas but not others by applying the stain in a circular manner. 


For the mask, I first applied one light coat of color to the tag and allowed this to dry.  This stain sets up fast and dries to lovely chalky colors.  I then placed the mask over the tag and apply the stain.  It is much easier to use a mask, even one as detailed as this one, as sponge applicator gets into all the nooks and crannies with ease.  I let the stain dry and removed the mask.  A stencil works just as easily. 

Next I stamped a variety of butterfly images from the three stamp sets in various colors and hues of the colors.  This gradiant stamping is easy with the ink sets and stamping is a snap with the cat's eye shaped inks.  I stamped these on card stock and onto the acrylic square.  The images stamped onto the acrylic need to set up at least over night or they smear.  Heat setting of the chalk inks is risky as the acrylic is prone to distortion from heat.  I sprayed the acrylic stamped images with a clear sealer before I cut them out. 


Once the images were ready to be cut out, I adhered those stamped onto the cardstock first and layered the acrylic ones over them.  I only adhered the acrylic images down the middle and once the glue dried, I gently folded the wings back and creased them.  The overlay and popped up wings resulted in more vivid movement on the tag.


I have always loved beautifully stamped images and words where the colors blend and go from lights to darks.  I used to use a q tip or a blending stick to apply the inks but never could get this technique to turn out the way  I wanted it to.  I did discover a short cut though that produces results almost as well.
I stamp one lighter color over the entire image, the word "laughter" in this case.  Then, using just the outer rim of the cat's eye ink in a darker color, I tap it gently around the top, bottom and two sides of the word. 


The stamped image has the graduated inking but with half the fuss.


I stamped the butterflies directly onto the "Laughter" tag, added Stickles, Liquid Pearls (love these) and some bling.  Can't wait to see what you create with these great stamps, inks, stains and other assorted goodies.