Showing posts with label altered project. Show all posts

Tuesday, March 15, 2016

March 2016 Guest Designer Craft Challenges


Nancy is our March 2016 Guest Designer and she's been busy creating new paper crafting challenges to inspire you!

Read a little more about Nancy and be sure to check out at least one of her challenges below!


Click here to visit her A Cherry On Top (ACOT) Gallery


Layout: Soda Obsession - Challenge #1 - 31 Flavors
Nancy says, 'This layout is of my youngest son and his obsession with trying different flavors of soda. For your layout I want to see pictures with lots of flavors, like donuts or cakes or coffees or candy bars or ice cream or soda or pizza---you get the picture!'


The rules:

1.  Open until midnight on Saturday April 2, 2016 (CST)
2.  You may combine with one other challenge that allows such.
3.  You can enter up to 2 times.
4.  Please post to the Challenge #1 - 31 Flavors thread on the ACOT Message Board.
5.  Random winner will be drawn and a $5 gift certificate to ACOT will be awarded.
6.  Must be a new Layout----layouts only on this one!


Layout: Mom's Graduation - Challenge #2 - Oldies & Goodies

Nancy says, 'I inherited all of the family photos this past year.  I always thought these photos made my mom look gorgeous when I was little. So for this challenge I would like you to use pictures that are over 20 years old or more'


The rules:

1. Only new layouts again!
2. Must have at least 3 pictures on each layout.
3. May combine with one other challenge that allows you to do such.
4. May enter up to 2 layouts.
5. All layouts need to be posted to the Oldies & Goodies Challenge #2 thread.
6. All layouts need to be entered by midnight, Saturday April 2nd. (CST)
7. Random winner will receive a $5 gift certificate from ACOT.


Project: Altered Drink Container - Challenge #3 - Altered Box Project
Nancy says, 'Don't moan too much! I want to have you think out of the box of your normal papercrafting and upcycle something. My usual go-to-item to recycle is cardboard drink containers. Remember my son's soda obsession? Well- I let him go in if he remembers to give me the cardboard container when finished. I have used these mainly for baby shower gifts filled with lotion and shampoo and powder, etc. But you could use them for desk organizers or birthday gifts or plasticware organizers,etc. Alter something to use for EASTER!'


The rules:

1. You need to recycle some type of box! (shoebox, drink container, cigar box, cardboard tube, etc.)

2. Must be submitted to the Challenge #3 – Altered Box thread by midnight, Saturday April 2, 2016. (CST)

3. You can submit up to 2 different entries.

4. Random winner will receive a $5 gift certificate from A Cherry On Top Crafts.


Click to view the details for Challenge #4 and Challenge #5

Happy Creating!


guest designer call
Click here to find out how to submit

Friday, November 16, 2012

How To Use Washi Sheets: ACherryOnTop.com


We love all things Washi!  Today, we're featuring WeR Memory Keeper's 12"x12" Washi Adhesive Sheets.  That's right - 12"x12" Washi!


In this video tutorial, you will learn how to use these Washi Adhesive Sheets to alter a glass jar. You can fill this jar with candy to make a wonderful Holiday gift for anyone on your list!

What you'll need:


Suggested Products:
washi paper   washi paper a cherry on top  washi paper a cherry on top
carta bella merry and bright  circle punchribbon

guest designer call
Click here to find out how to submit

Wednesday, April 25, 2012

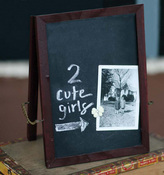
Altered Chalkboard Easel How-To

Ashley takes Jenni Bowlin's Chalkboard Easel and transforms it into a fabulous picture display that will brighten up any space!


Watch Video:


Suggested Products list:

jenni bowlin chalkboardecho park graceful borders
mini bags canvas corp


 available at ACherryOnTop.com

Wednesday, January 25, 2012

How To Make Valentine Gift Card Treat Holders

Posted by kbuck092207

Step By Step How-To Video:


In this video tutorial, you will learn how to make these Valentine's themed Ghirardelli Treat Holders. 


What You'll Need:


Instructions:
  1. Cut scrapbook paper to 9 3/4" x 3 1/2"
  2. Score at 3 1/4" inch on each side & fold.
  3. Cut triangle off one side to create pocket for candy.
  4. Fold triangle in, and use Scor-Tape or Sticky Tape to adhere to inside.
  5. Round outside corners with 1/4" side of Corner Chomper
  6. Print and cut out digital stamp, layer onto scallop circle punch.
  7. Add stamped images and ribbon to embellish, stamp sentiment on inside if desired.


Tuesday, December 6, 2011

How To Make A Paper Bag Banner


Posted by happayscrappay (Rachel):

The anticipation and excitement around Christmas is so fun to share with the whole family.  My youngest is just learning to read numbers and I thought he would enjoy a home decor item that would help him count the days as they pass until Christmas arrives.   I have decorated small kraft bags and hung them by clothes pins from a string of twine. 


The inspiration for this project came from a wedding seating chart and the project could easily be adapted to many situations (birthday countdown, party favors, etc) simply by changing the way the bags are decorated.  Inside the bags could be little sayings, candies, or other goodies. 


Here's a look at the supplies I used, mostly from Prima North Country, but also Kraft bags, Martha Stewart lace, and K&Co Evergreen Paper Tape and glittered clothes pins.


Each bag is decorated individually and plain clothes pins are also decorated to make them prettier and to match the theme of the banner. 


Decorative tape of any kind can be used on the clothes pin. 


Tear off a strip of the tape and lay it on the clothes pin.  I lined up the side of the tape with one side of the clothes pin, the side where the spring sticks out so I didn't have to remove excess tape from that side.


Using a file, I sanded the edge of the clothes pin through the tape.  This cut the tape and made it easy to remove.  I repeated the same process on the other side of the clothes pin.


I now had decorative clips to hang my bags with.  I made about 8 clips like this.  Another product I used was the North Country Resist Canvas from Prima.  This stuff is really, really pretty!  It is easy to colorize with mists and when you do, a pattern is revealed on the surface of the canvas.  I also tried using distress inks on the canvas and it worked well, too. 


Even I admit this is strange, but I apply ink and mists with a baby wipe alot of the time.  It is already damp so the color soaks in well and it is easy to distribute onto a surface.  On paper it gives an additional distressed appearance on the canvas it allowed me to blend colors with ease.  Below you can see what the deer looks like after a little distress ink has been applied in a circular motion.


It also helps the resist pattern to appear whiter and brighter if the canvas is wiped after the application of any color.  To decorate the bags, I used bits of patterned paper, flowers, the canvas images, glimmer mists, and lace. I decorated each bag first and then laid them out in a line to see which order of bags I would like the best.  I then applied the date with a stamp and some dark brown chalk ink. 


No two bags are alike but because all of them are decorated out of the same line, they are coordinated in color and pattern.


Some of the bags were folded over and some were left open and decorated that way.


Decorative tape was also used on the inside of the bag with the deer.  Other times, I added patterned paper to the inside of the bag so that it could be seen at the top of the bag.


Then, much like the stockings, the banner was hung by the chimney with care!  I cut a long piece of twine and hung it from the hearth.  The bags were all clipped to the twine.  Then, lace was woven behind and around the clips just to make it even more pretty!


We will be able to enjoy the banner as a whole and each bag individually when we take them down, one at a time, in December.  Overall, this project took me one afternoon and one morning to make.  You could make something similar, with less detail, but still plenty of visual impact in about an afternoon. 


Many thanks to A Cherry On Top for the products used in this project: