Wednesday, January 25, 2012

How To Make Valentine Gift Card Treat Holders

Posted by kbuck092207

Step By Step How-To Video:


In this video tutorial, you will learn how to make these Valentine's themed Ghirardelli Treat Holders. 


What You'll Need:


Instructions:
  1. Cut scrapbook paper to 9 3/4" x 3 1/2"
  2. Score at 3 1/4" inch on each side & fold.
  3. Cut triangle off one side to create pocket for candy.
  4. Fold triangle in, and use Scor-Tape or Sticky Tape to adhere to inside.
  5. Round outside corners with 1/4" side of Corner Chomper
  6. Print and cut out digital stamp, layer onto scallop circle punch.
  7. Add stamped images and ribbon to embellish, stamp sentiment on inside if desired.


Monday, January 23, 2012

Announcing Weekly Giveaways!

Now through April 7, 2012 we're giving away all kinds of goodies!


Be sure to 'like' our facebook fan page for all of the details and to enter!


This week's giveaway features amazing products from Tim Holtz!


giveaway


Click HERE to view the official sweepstakes rules.


Sweepstakes open to all residents of the US and the District of Columbia.  Void where prohibited.  

Friday, January 20, 2012

Our Digital Creative Team Takes Time To Reflect

Posted by MamaK321

on the years past and what the future holds, is the subject on the minds of our Digital Creative Team this week. You'll find inspirational layouts below reminiscing childhood adventures, preserving a special moment in time and becoming awestruck at how quickly time flies when we're busy living life. 


If you enjoy these layouts, leave our CT ladies a little love. Then head over to the Digital Shoppe for the latest and greatest products!


Take Two by Lindsay,
January Guest Digital CT Member


"A "Now vs. Then" layout of Devlin at the Pumpkin Patch. I was lucky enough to get this shot as he poked his head thru the hole, just like he did back in 2008."


Year One Travels: Indian Ocean by FairyMouseMom

Egle masterfully combines products from 4 different designers to create this beautiful layout featuring a dear friend's lovely daughter.


Natural Beauty by MamaK321

"Our children grow up so very fast!  My daughter wanted to try on this beautiful dress that she said reminded her of Phantom of the Opera. She looked so lovely."


I Love My Furbaby by sarahwhithers

Jen's furbabies are a constant (and shall I add adorable) subject of her layouts and here, she expertly uses an aptly named kit to create a fabulous anniversary page.


Like what you see above? You can find these brilliant new products in the Digital Shoppe.


Wednesday, January 18, 2012

How To Create Four Layouts From One Sketch


Posted by SarahA

Sketches can be a scrapbooker's best tool when it comes to getting layouts done when you're short on time. They can give your creativity a jump start and encourage you to try design ideas you may not have thought of before. 


Sometimes though, searching for just the right sketch that speaks to you can be difficult. Sometimes you may find a sketch you love, but you don't want to use it more than once so you don't have layouts that all look the same in your albums. 


I'd like to show you how you can stretch just one sketch into four very different layouts.


I started with this sketch from PageMaps that I really liked for several reasons. I really liked the 3 patterned paper pieces, the stitching and the little cluster in the bottom corner.


Holiday Greetings
The first layout I did was a pretty close to exact interpretation of the sketch. I kept all the design elements in place. The main difference is changing the presents out for snowflakes on my layout. I even used the same photo dimensions given on the sketch. I really liked the October Afternoon Holiday Style line- it went perfectly with my photos and were bright, happy Christmas colors.


Before & After
 A few weeks ago I was talking with a friend and she mentioned looking for a sketch, but not having the right size photos listed. When using a sketch, there are no rules! On this layout, I followed the sketch pretty closely for the design, but used 2  4x6 photos instead of the 3 smaller photos on the sketch. 


I also placed the title differently and added some journaling around the edges. You can see the basic sketch in my layout, but I've made a few changes to suit the photos I had. The My Mind's Eye Kraft Fun Day line has a lot of great, trendy designs. I especially liked the number paper for this layout about the first day of school. I used my white pen to give the kraft pieces a little dimension.


Family of Four
I've really been into doing 8.5x11" pages lately. I am able to easily include them in my D-ring albums amongst my 12x12 layouts. Actually, the first 8.5x11 I tried was earlier this year using a sketch! I would say the majority of sketches are 12x12, but that doesn't mean you can't use them to create a different sized page. 


You can always scale it down if you're doing an 8x8, a mini album, or an 8.5x11 like I did here. I shrunk the size of the paper pieces and used one large photo. I kept the title placement, cluster at the bottom of the page and at the bottom  of the right-hand strip of paper.  


The Sidewalks line from October Afternoon was just perfect for this photo of a newborn baby and happy family! You can't beat October Afternoon's vintage whimisical style when scrapping a baby!


Two Months
This layout deviates the most from the sketch, but you can still see how they are related. The 3 patterned paper pieces were my favorite part of the sketch- I really love the uneven number design principle! I had an 8x12 photo I had been wanting to scrap, and decided now was the time! 


 I cut three 4x4 squares and used zig-zag stitching to adhere them to the bottom of the layout. I placed the photo at the top. The sketch had stitching around the title, so I stitched my title alphas to the layout. A few stickers under the title reflect the "date" clusters from the sketch. 


So, you can see that there were elements of the sketch that I used in this layout, yet the layout doesn't resemble the sketch much at all.


You can see how if you have one sketch you really love, you can make several layouts from it without feeling like you'll have four of the same layout in your album. Just by using different size or number of photos, rotating the sketch, or by just pulling several elements from the sketch that you really like will let you stretch your favorite sketches further!  Even when they're all lined up together, you still see 4 distinct layouts.


Holiday GreetingsBefore & AfterFamily of FourTwo Months

Products used in this reveal:

Silver Bells Paper - Holiday Style By October AfternoonHolly Jolly Paper - Holiday Style By October AfternoonSprinkles Paper - Happy Days - Kraft Funday By My Minds Eye Ziggity Paper - Everyday Fun - Kraft Funday By My Minds EyeHappy Days Chipboard Elements - Kraft Funday By My Minds EyeApron Strings Paper - Country Drive By Echo ParkSidewalk Word Cardstock Stickers By October AfternoonHappy Days Buttons - Kraft Funday By My Minds EyePink Sorbet Bakers Twine, 15 Yards White Broad Uni-Ball Signo Gel Impact by Sanford

Tuesday, January 17, 2012

See What's New in The Digi Shoppe

Posted by Smiley-Scrap8

 
Have you been in the Digital Shop this year yet? Well you don't know what your missing. There are tons of new kits just right for all of those memories you'll be making in the new year. Below are a few layout showing just a small sample, so don't miss out and check out the digi shoppe today!


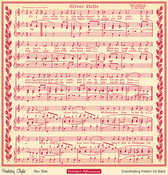
Praying for Snow by Lindsay (Our January Digi Guest CT)


I just love her photoless wish for the wintery white stuff, here's what she has to say, "I can't scrap any snow pictures because we haven't had any snow. It's been such a warm winter, but I'm not complaining. The boys on the other hand would love for those flakes to fall."

See more of Lindsay's gallery HERE.

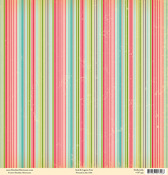
Relaxed by Art_Teacher


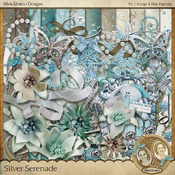
Laura says, "For this layout, I just had to use Bella Gypsy's "Sweet Serenity" kit, because it has paisleys in it! I always try to put them in my Paisley layouts. :)
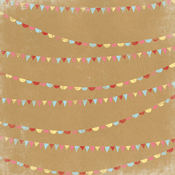
Top of the World by Art_Teacher


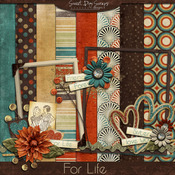
Laura says, " For this reveal, I chose Silvia Romeo's "Circle of Life" kit. This kit is full of amazing and unique embellishments and gorgeously detailed papers. Plus, the color scheme is classic and nearly any photo could go with it! I love the romance of Silvia's kits, too, so I often use them for photos of me with my husband."
See more in Laura's gallery HERE!
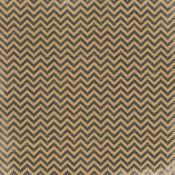
Dec 18th by nun69


Angie says, "Loved working with Theresa Hernandez's Nutcraker Sweet kit to add some more pages to my December Daily 2011 album! This kit is not only good for your Nutcracker pictures, but any fun Christmas."

See more layouts in Angie's gallery HERE!

Snowflakes by Smiley-Scrap8


Ronny says, "My kids really enjoyed the amazing snowfall last year. I couldn't find a better kit to scrap these memories than Cold & Frosty by Crisdam Designs. I really love the snowflakes elements and the cute penguin, I can just feel the cool when I look at this page."

Sweet, Sweet Chubby Cheeks by Smiley-Scrap8


Ronny says, "My baby girl showing off her chubby cheeks. When I saw the new I Promise Kit by Kreations by Kami I knew it would be perfect for this photo. Her kits are the ones I go to when I have a special photo that I want to highlight. There is just something about her simple design and muted colors that helps my photos look there best."


See more layouts in Ronny's gallery HERE!

Happy Scrapping!!

Friday, January 13, 2012

How To Use A Mood Board For Crafting Inspiration


Posted by happayscrappay (Rachel):


I don't use Pinterest - there I said it, I don't use Pinterest.  But, I do create my own mood boards like clothing and other designers do when they go to create genius lines that inspire you to whip out your wallet and buy, buy, buy.  Mood boards can also help a designer and a client come together with their ideas. 


I use my mood boards to spark creativity within a theme and to help me decide what design elements I would like on a scrapbook page.  You can make a mood board, too!  All you need is a blank cork board or other surface (like the cardboard inserts that come with your ACOT orders) and a little bit of time. 


Pre-planning projects with a mood board can help save you time when you sit down to create.


Here is the corkboard that I use to create my mood boards:


Once you have decided on the surface for your mood board, you can start picking things for it by browsing your favorite websites or magazines and cutting or printing out images that appeal to you. You can add things slowly to it, filling in the spaces and rearranging as you go.  Here is the mood board I created for the theme of winter.


I placed the mood board close to my scrapping table so it was close by when I needed inspiration.  I fully intended to make some scrapbook pages in this theme but then I ended up focusing on snowmen.  On my board I have fabric pieces that were speaking to me of winter and snow or ice skating.  


I have pictures of snow flakes, snow, and snowmen.  I have pictures of people in sweaters with fair isle prints, and I have lots of 3D pictures.  I thought they were really cool and spoke to me of winter.


To incorporate the 3D aspects of my mood board into my projects, I created this mini-album.


I cut sheets of chipboard into 4.25 inch squares.  I needed 4 of them for this album.  The cover of the album is decorated with cardstock, ink, ribbon, and see-thru embellishments.


Inside the cover we come to the first 3D pop-up page.  The sledding child pops away from the background and the snow flake pops open.  I created a snowy surface for the chipboard image by gluing some fabric to the patterned paper base.  


From the top you can really see how the chipboard pops away from the background:


Turning the page reveals another snowy 3D scene with a child playing under a banner of snowballs. 


Obviously, the colors of the mini-album are also inspired by the mood board. 


The third page offers a little different take on 3D and looks a little like the snowflake in the pop-up book from the mood board.  I used a border punch on a strip of paper and then accordion folded it.  I glued the ends of the strip of paper into the corner of the book and attached snowflakes to some of the folds. 


The entire album folds flat as can be seen from the bottom in this picture.  And, it's tied shut with a ribbon.


The next project that was inspired by the winter mood board is an altered snowman container.  I get really sad after the Christmas decorations are gone.  Winter has just started and all the fun has been taken down and put away.  I wanted something to decorate with that said - Winter is Fun!


The embellishments from Little Yellow Bicycle's Winter Twig are perfect - with perfect color and the perfect textures.  I added some to the hat of my little snowman and decided to stop there.  He doesn't really need eyes and a nose does he?


When I was done with the snowman I thought to myself - what's better than one snowman?  TWO!  And then I spied a mason jar on my shelf.  I thought it looked a lot like ice when you look through it.  And, the confetti looked like falling snow.  So, I made a happy little snowman in a jar who can also sit on a shelf to bring me winter cheer.


With a little cotton stuffed inside for snow, I think this is my favorite piece of the collection.  To make it, I used glossy accents to glue strands of the garland to the bottom of the jar.  I had to do this one piece at a time and let the glue dry in between.  


Then I glued the snowman to the lid of the jar with some cotton and screwed the lid on.  If you have an old mason jar (or two, or three!) laying around, I highly recommend giving this a try!


While I didn't get to making any scrapbook pages from my mood board, it is still assembled and I have tons of sledding pictures that need a home. I plan to use it to inspire a few layouts in the future! 


I hope you've learned a little about using a mood board and have been inspired to give it a try.  While the one here is physical, you certainly could use a computer program to generate a digital mood board.  For me that would be a little difficult - I love the fabric samples attached to mine.  ;)


Many thanks to A Cherry On Top for the materials used in making these projects: